Today is the world of multimedia. People around the world are creating compelling videos to attract their audiences. Hence, creating exciting videos is beneficial for almost all businesses. Editing and merging clips are important to create high-quality videos. Different clips can be taken from different sources to form a complete full-fledged video. There are many software packages available, which can be used to join the clips seamlessly and effectively. One such software package is VideoProc. This is one of the most recommended software to merge videos with a bunch of video editing features.
With VideoProc, you can merge as many videos as you want without any re-encoding. You can also trim and merge the videos. There is an option to remove unwanted parts from the videos. Also, with the help of VideoProc, multiple audio/video tracks can be combined as a single MKV file. Very high video processing speeds are rendered by this particular software package.
Here, we will have a look at the step-by-step guide to merging multiple videos with VideoProc.
Directly joining different videos into one file
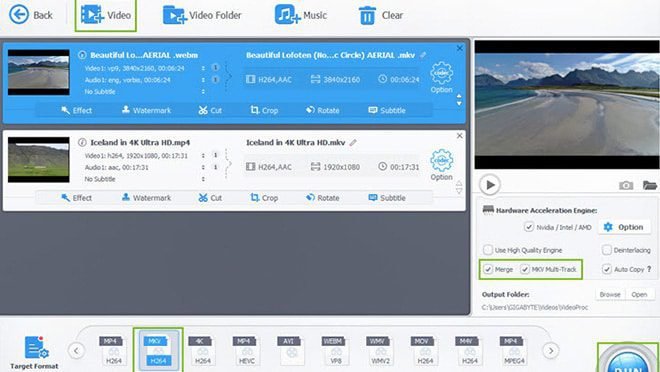
At times, there is a requirement of joining different video clips together. This can be required with or without the re-encoding. The VideoProc package can put the video clips together of any resolution, file format, or video audio settings. The step-by-step process is depicted below:
Step 1 – Select Videos
You have to first open the VideoProc and then click on the “Video” icon on the main interface. Then you have to add videos by clicking on the “+ Video” icon. The different videos which you want to add must be selected one by one. The Videos can also be dragged, and dropped in the required area. You can also upload several videos at one time by clicking the “Video Folder” icon.
Step 2 – Select Output format
After the first step, one will have to choose the output format of the file. If the output settings are the same as that of the source files, the videos will be combined without re-encoding.
Step 3 – Click “Merge”
In order to enable the merge option the box named “Merge” on the right should be checked.
Step 4 – Click “Run” to start merging videos into one
After the above steps, the “RUN” button needs to be pressed to execute the video merging.

Cut Videos at first and then merge them into a single one
There are times when you want to cut the video clips before joining or merging them. This can be required to remove the unwanted video portions from your video clips. Also, the dead time at the beginning and end of various video clips can be removed by utilizing this option. So, here is the step-by-step process to do the same:
Step 1 – Load Videos
Open VideoProc and click on the “Video” icon, then click the “+ Video” and “+Video Folder” icons to add videos you want to merge.
Step 2 – Select Output format
After the above step, choose the target file format of the output file. This should be done by selecting the appropriate option from the “Target Format” Menu.
Step 3 – Click “Cut” to trim unwanted parts
Click “Cut” to customize the staring and the end time of video clips by using a slider. You can also crop unwanted parts, add effects/watermark/effects to videos, rotate, or adjust video/audio volume, playback speed, etc.
Step 4 – Tick “Merge” tab and click “Run” to start
Click on the “Merge” button on the main interface and then click on “RUN” to start merging the trimmed videos.

Thus, we have seen the step-by-step procedure to merge the videos by using VideoProc. You can also follow these steps and execute Video mergers efficiently.
