Just like the revolutionary era of the floppy disk and cd, the wave of popularly for DVDs seems to lose its steam. With the exponential advancements in the domain of digital storage technology and cloud, this decade has been primarily dominated by flash drives and cloud storage. Those portable and small flash drives and hard discs can store GBs and TBs of data and offer high-speed transfer capabilities.
But, if you are one of those guys who loved collecting DVDs and building up their stack back in those days when was the last time you actually heard someone as for them anymore, and neither did you find modern laptops equipped with the disc drives. Soon the DVDs would also become a legacy.
Now if you have a lot of DVDs and are wondering if you could extract all that data (movies, music, and pictures) and save it on your hard drive, this just might be the right time to do it. A handbrake DVD Ripper is one of the best video conversion tools that you need to rip the DVD onto your system.
For those who are new to DVD ripping, ripping a process is quite similar to copying, but mostly related to extracting data from the DVD, saving it on your device in a different format. Also, there are certain legal guidelines and restrictions to ripping a DVD, so one should not engage in piracy with these rips and best limit them for personal use only.
Ripping a DVD with a Handbrake is free but a little complicated, hence, we’ll start with an easy yet professional DVD ripper named WinX DVD Ripper that is currently free of charge. Developed by WinXDVD, ripping DVD with WinX DVD Ripper only needs 3 steps.
Preparation: Download and install WinX DVD Ripper. (Click “Get Giveaway License” to download a free licensed copy.)
- Open WinX DVD Ripper, and Click “+Disc” button. You can also load ISO image and DVD folder.
- Choose an output format. There are many output profile for you to choose, like MP4, MOV, AVI, MKV, MP4, iPhone, Android, TV, Xbox, Surface, etc, almost covering all mainstream video audio formats and devices.
- Click “Run” to start ripping DVD at lighting fast speed. WinX DVD Ripper uniquely supports level-3 hardware acceleration powered by Nvidia CUDA/NVENC and Intel QSV, hence, the DVD ripping process will be finished in the most possible shortest duration, while using a low CPU usage.
 Coming back to creating how to rip DVD with Handbrake DVD ripper, here’s a step-by-step guide to help you out.

1. Getting your hands on Handbrake
Handbrake is a free and open-source video converter and you can download the latest version of Handbrake from its official site https://handbrake.fr/ based on the operating system and platform (Windows, Mac, Linux) you use. Before downloading and installing, make sure your device meets the system requirements for the software.
2. Installing Handbrake
The installation process for Handbrake varies from platform to platform.
a) For Windows, you simply need to double-click and launch the downloaded installer and click through the installation windows. Once the installation completes, click on the finish button and launch the software.
b) For Mac, drag the downloaded application image to the ‘Applications’ folder and the application would install on your device.
3. Ripping copyright protected files
If you are planning to rip a commercial disk (copyright protected), you would need an additional library ‘libdvdcss’ to decrypt the protection. This is also open source and can be easily found on the web. Download the library and install it on your system.
a) If you are on a Windows system, simply move the downloaded application file to Handbrake’s root directory
b) If you are on a Mac platform, you can install the library with some command-line scripting.
4. Ripping the DVD
Once you are all set, it is time to start ripping
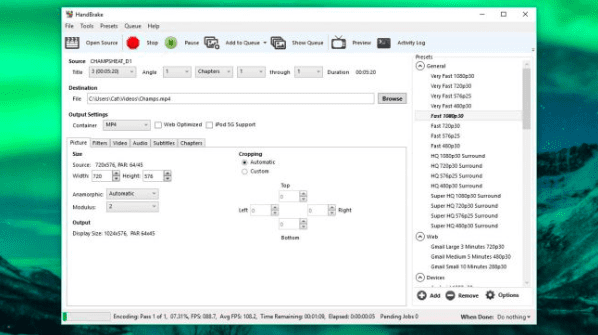
a) Launch the Handbrake application on your computer and select your DVD drive. The application along with the libdvdcss library will read through the contents of the disc. This may take a while.
b) Navigate to the “Title” dropdown box and choose the track you wish to rip.
c) Down below, there are a few customization tabs that you can use to adjust the properties for the ripped file. This includes the frame size, audio, video, adding subtitles, etc.
d) If you aren’t too good with the technical stuff, navigate right and check out the presets and make your choice.
e) Once all this is done, click on the Start Encode tab, and your handbrake DVD rip will be ready in some time. Check the progress bar down below for the status.
As the ripping is complete, go ahead and relish the fruits of your efforts and enjoy your video. In the meantime, you can set up more handbrake rip DVDs and complete your collection.